Emergency Systems
Warning and Indicator Lights
Telelight Panel
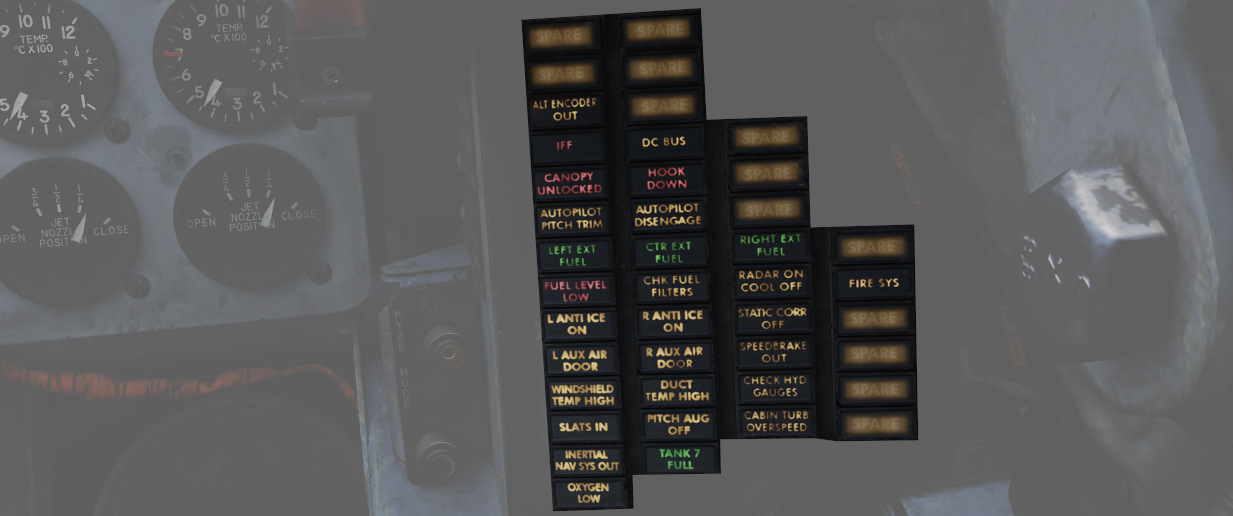
The majority of cockpit warning lamps are found on the telelight panel on the right sub-panel in the front cockpit. See the Emergency Procedures Supplement for a comapct list of them or see the one below:
| Light | Explanation | Light | Explanation | Light | Explanation |
|---|---|---|---|---|---|
| Alt Encoder out | The light will illuminate if there is an unreliable signal or no signal from the altitude encoder unit. It also may illuminate momentarily during high-rate climbs, dive maneuvers or during transonic flight | ||||
| IFF | The light will illuminate when the Mode 4 code is zeroed or no code is inserted | DC Bus | The light will illuminate if both generators fail or if a voltage drop occurs between the main dc bus and essential dc bus. | ||
| Canopy Unlocked | The light will illuminate in the front cockpit if any canopy is not locked and lowered. The rear light will only illuminate when the rear canopy is not fully locked and lowered. | Hook down | The light will illuminate if the arresting hook is not up and locked. | ||
| Autopilot Ptich Trim | The light will illuminate when the AFCS is engaged and the automatic pitch trim follow up is inoperative or lagging sufficiently behind the airplane maneuvering. | Autopilot Disengage | The light will illuminate when the autopilot is disengaged after initial engagement of the AFCS. | ||
| Left Ext Fuel | The light will illuminate if the external fuel tanks are selected and there is no fuel flow from the tank to the fuselage. | CTR Ext Fuel | The light will illuminate if the external fuel tanks are selected and there is no fuel flow from the tank to the fuselage. | Right Ext Fuel | The light will illuminate if the external fuel tanks are selected and there is no fuel flow from the tank to the fuselage. |
| Fuel Level Low | The light will illuminate when the Fuel level in cells 1 and 2 has reached a predetermined fuel state of 1650 ± 200 pounds. | CHK Fuel Filters | The light will illuminate when the fuel filter is clogged. The filter automatically opens to bypass, allowing normal fuel flow to the engine | Radar On Cool Off | |
| L Anti Ice On | The light will illuminate when the anti-ice bleed air system is on. | R Anti Ice On | The light will illuminate when the anti-ice bleed air system is on. | Static Corr Off | The light will illuminate if the SPC fails or the CADC switch is placed to CORR OFF |
| L Aux Air Door | The light will illuminate when the left auxiliary air door operates out of phase with the landing gear handle. | R Aux Air Door | The light will illuminate when the right auxiliary air door operates out of phase with the landing gear handle. | Speedbrake out | The light will illuminate if the speed brake is out or not fully closed. |
| Windshield Temp High | The light will illuminate when the windshield approaches a temperature which will cause optical distortion while the windshield rain removal is used. Windshield rain removal should be turned off immediately. | Duct Temp High | The light will illuminate when the temperature within the engine intake duct is beyond allowable limits. | Check Hyd Gauges | The light will illuminate if the pressure of any system drops below 1500 ± 100 psi. |
| Slats In | The light will illuminate if the Slats Override Switch is placed to the IN position, forcing the slats to stop moving as a function of the AOA. | Pitch Aug Off | The light will illuminate when power is on the airplane and the pitch stab aug switch is not engaged. | Cabin Turb Overspeed | The light will illuminate if the cabin turbine of the refrigeration unit is subjected to pressures and temperatures in excess of the normal operation. |
| Inertial Nav Sys Out | The light will illuminate if the Inertial Navigation system is either out or off. | Tank 7 Fuel | The light will illuminate when the fuel transfer valve fails to open. | ||
| Oxygen Low | The light will illuminate when the oxygen amount is below 1 litre. | Fire Sys | The light illuminates when either a fire/overheat detector sensor tube is burned through, a detector wire chafes to ground or the control module fails. |
Master Caution
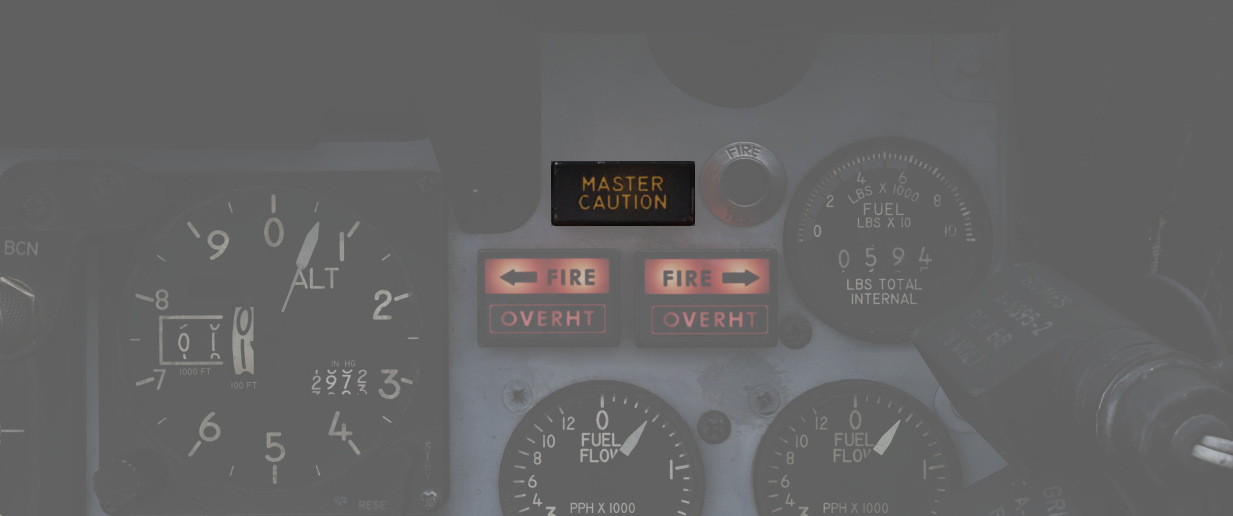
Found in the front cockpit, the MASTER CAUTION provides the pilot with an up-front warning of potential hazard to the aircraft. The MASTER CAUTION illuminates concurrently with most warning lamps on the telelight panel and the generator indicators; warnings that do not set off MASTER CAUTION are noted in the Telelight Panel list.
MASTER CAUTION can be deactivated by the pilot pressing the reset button on the right console. However, it is important to note that pressing MASTER CAUTION does not clear a warning on the telelight panel; instead, the warning will remain until rectified. Should an additional event occur that requires attention, MASTER CAUTION will illuminate again.
Warning Light Test Circuit
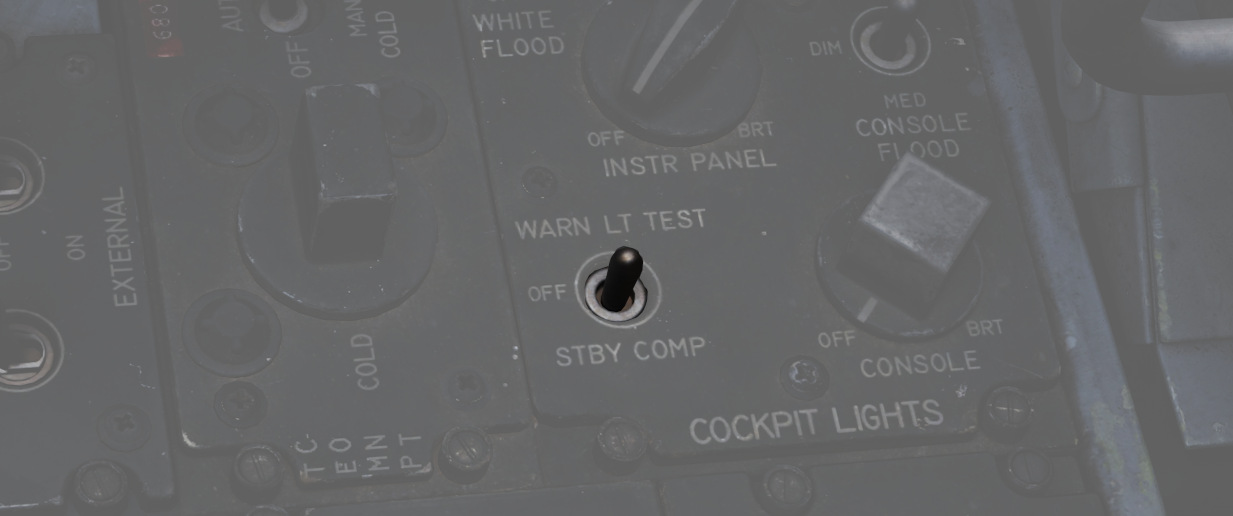
Confirmation of bulb function can be performed using the Warning Test Light Circuit found on the interior light control panel in both cockpits. These do not perform a function text for the individual warning systems, only confirm that the lights will illuminate.
Engine Fire and Overheat Detector System

On the right upper instrument panel in the front cockpit are four warning lamps- two FIRE and two OVRHEAT lights, one for each side. Should a fire be detected in an engine compartment, the applicable FIRE lap will illuminate. Overheat detectors are mounted at the rear of the fuselage adjacent to the engine nozzles, and illuminate the respective OVRHEAT lamp should temperatures become dangerous to the aircraft.
Fire Test Button
When pressed, this button tests for functionality of the FIRE and OVRHT lamps. Can also be used in conjunction with the Warning Lights Test switch to confirm detection and continuity performance of the fire and overheat warning systems. Holding the Warning Lights Test switch in the WARN TEST position, then simultaneously pressing and releasing the Fire Test Button performs the test. Proper system function is confirmed with the four FIRE and OVRHT lamps off while the Fire Test Button is pressed, then illuminating when it is released.
Ejection Seats
The Phantom II uses the Martin Baker Mk. H-7 ejection seat in both positions for safe aircrew extraction in the event of airframe loss. Triggering ejection using the face curtain or lower ejection handles fires the seat mounted initiator that jettisons the canopy. Once the canopy is clear of the airframe, the ejection gun primary charge fires, unlatching the seat from the cockpit and initiating seat climb-out. As the seat rises, restraints on the legs pull them back for clearance and the drogue timer is set. At the appropriate height, a lanyard attaching the rocket motor initiator to the airframe trips the firing pin for the main rocket engine to clear the aircraft. The previously set drogue gun fires at this time, deploying a pair of small chutes to stabilize the seat in attitude and initiate deceleration.
Once the seat has reached a pre-set barometric altitude between 11,500 and 14,500 feet, or momentarily after stabilization if lower, scissor mechanisms release the crew-member with the survival kit-containing seat pan from the ejection frame and deploys the main chute. In the event of ejection below the barostat altitude, the WSO chute is fully deployed at 5 seconds after ejection initiation, and the pilot one-second later.
Eject Light
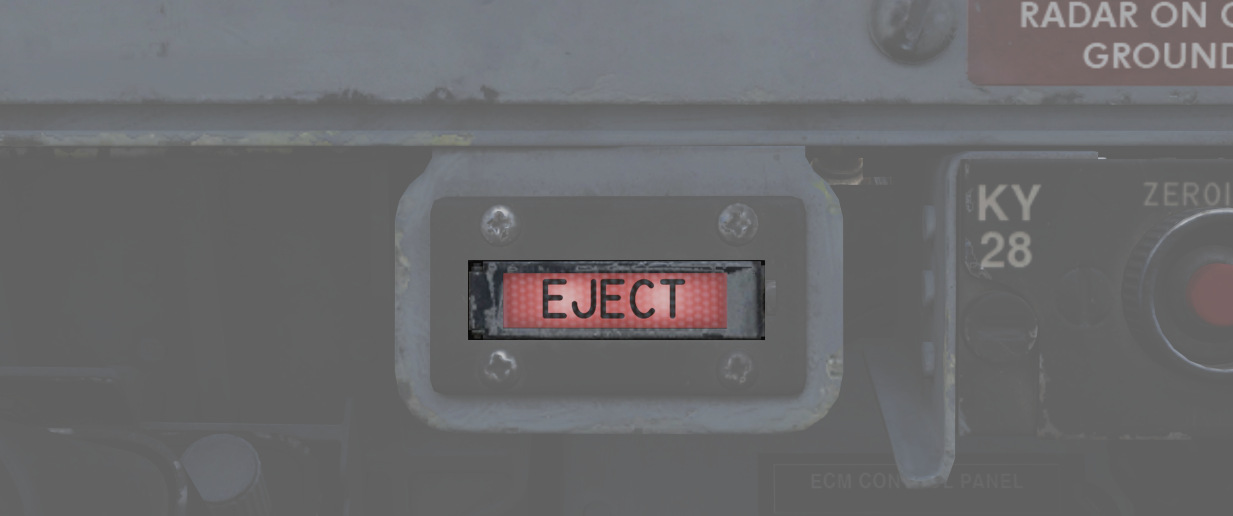
In the event of loss of intercom power, the pilot can warn the WSO to prepare for ejection by pressing the EJECT switch found on the left canopy sill forward of the flap switch. This illuminates a pair of warning lamps found on the rear cockpit indicator panel.
Command Selector Valve Handle
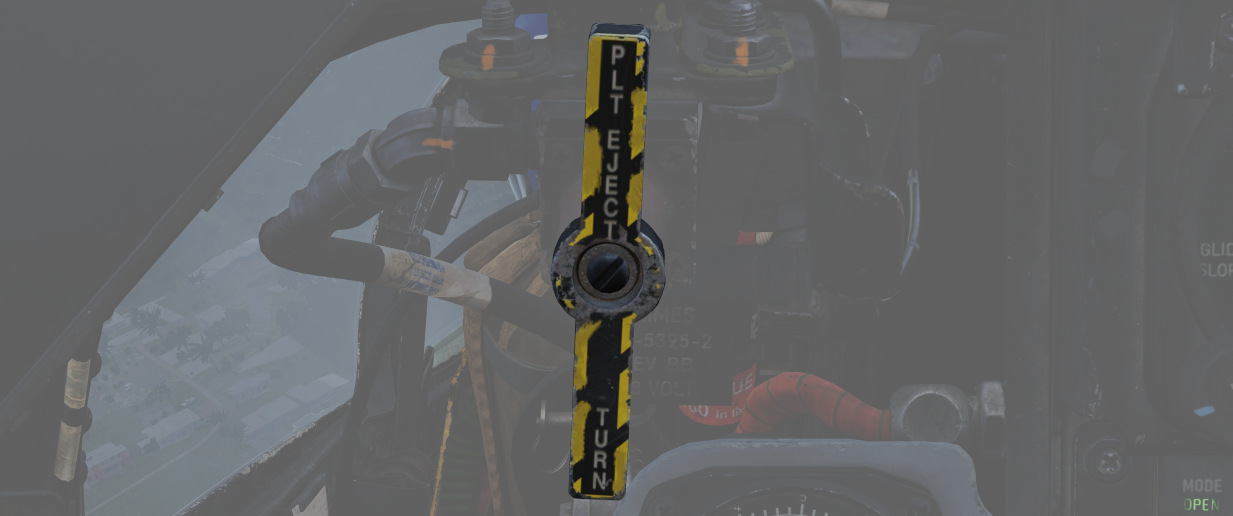
To the left and above the rear cockpit instrument panel is the Command Selector Valve Handle. This handle determines the sequence by an ejection initiated from the rear seat - both seats, or the rear seat only. The handle is marked PLT EJECT PULL TURN. When the handle is oriented vertically, single seat ejection is selected; to set dual seat ejection, the handle is rotated clockwise to the horizontal.
All ejections initiated from the front seat are dual ejections.
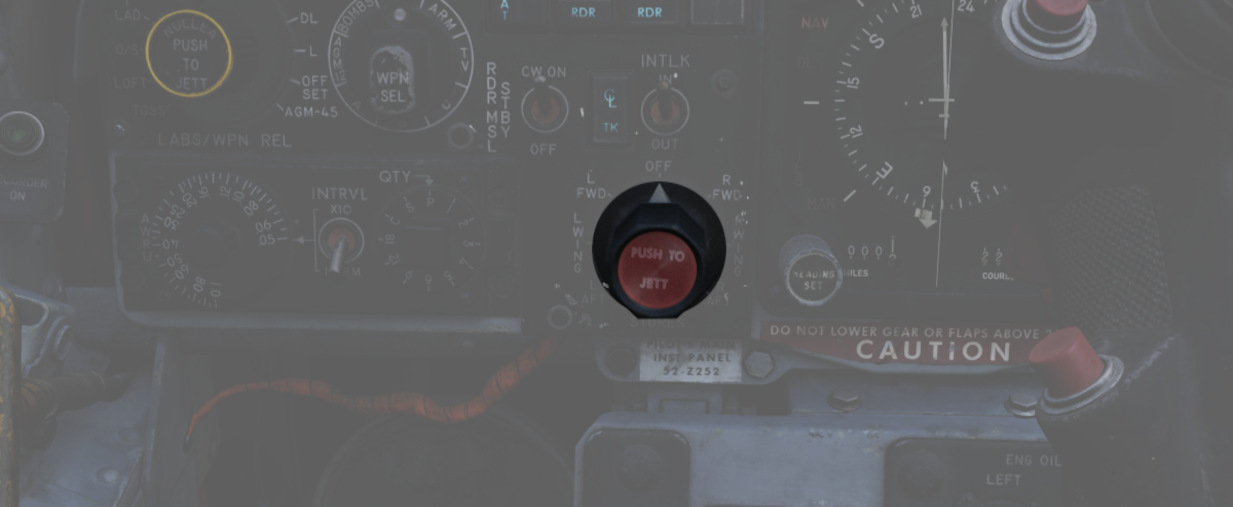
Jettison System

The majority of stores carried by the F-4 can be jettisoned from the aircraft while in flight and with the landing gear stowed and doors closed. Jettison does not remove pylons, and the AIM-9 Sidewinder is non-jettison-able.
| Name | Description |
|---|---|
| OFF | Safes PUSH TO JETT button on the Selective Jettison Control Panel. |
| STORES | Releases all MER/TER, single carried, LAU-88 mounted rounds, or drop tanks upon PUSH TO JETT. |
| L/R FWD | Jettisons AIM-7 from respective position on PUSH TO JETT. Inhibited if CL TK ON. |
| L/R AFT | Jettisons AIM-7 from respective position on PUSH TO JETT. |
| L/R WING | In conjunction with TV or ARM, jettisons single AGM-65 Maverick or AGM-45 Shrike from wing on PUSH TO JETT. |
External Stores Emergency Release Button
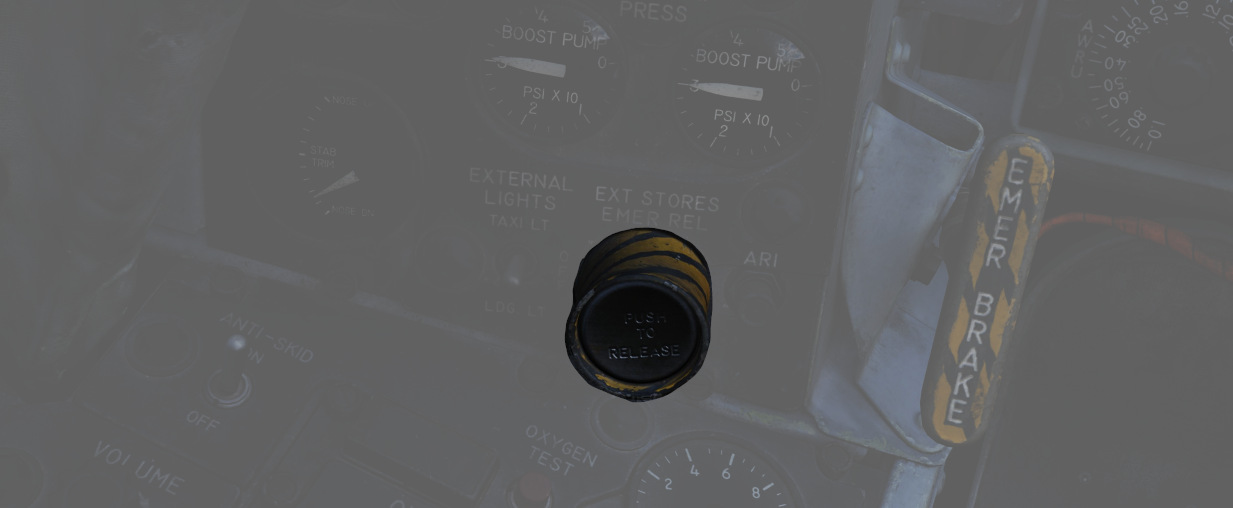
Found on the front left cockpit sub-panel, the External Stores Emergency Release, also known as the panic button, will release all air to ground munitions, external tanks, and any pods subject to jettison. Sparrow and Sidewinder missiles, along with all pylons, will remain in place. Pushing the button will show the yellow paint inside its recess to confirm its actuation. Performing the actuation disengages external fuel tank transfer automatically, permitting proper flow of internal wing tanks without further pilot action.
The button is active so long as the aircraft gear handle is up, or, the ground safety override switch is depressed.
Selective Jettison
Wing and centerline stores can be jettisoned independently using the Jettison Knob in the STORES position, selecting the desired Station Select Buttons to release, and pressing PUSH TO JET. Any pylon or missile launcher at the station will remain in place, but stores - including MERs and TERs, will be released.
As example, to jettison the right and left external fuel tanks, the pilot must select STORES on the knob, press the corresponding station select buttons LO, RO and then push the jettison button.
AIM-7 Jettison
AIM-7 Sparrow missiles are released individually using the L/R FWD or L/R AFT positions on the Jettison Knob, then pressing PUSH TO JETT.
AGM-65 Jettison
To release AGM-65 missiles, choose TV or ARM on the Weapon Select Knob, press the desired Station Select Button(s), select L WING or R WING for the Jettison Knob, and press PUSH TO JETT. One missile is released per press; once desired rounds are removed from one wing, select the other wing with the Jettison Knob and repeat the PUSH TO JETT cycle.