Pave Spike

The AN/AVQ-23 Pave Spike targeting pod is the successor of the AN/AVQ-10 Pave Knife and predecessor of the AN/AVQ-26 Pave Tack pod. It entered service in 1974 and was replaced from 1982 to 1989 by the Pave Tack pod. It provides a slew-able TV image for spotting ground targets and can fire laser for determining range information and to guide laser guided weapons.
The line of sight can be controlled by the WSO, using the Antenna Hand Control. The camera image is displayed on the DSCG scope and can be viewed by both, the Pilot and the WSO independently.
Targeting Pod
The system has an optical camera for daylight operation with one level of optical zoom, for a wide and narrow (4x) field of view.
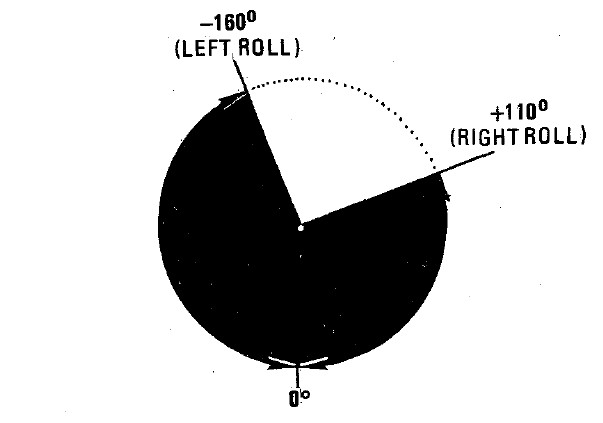
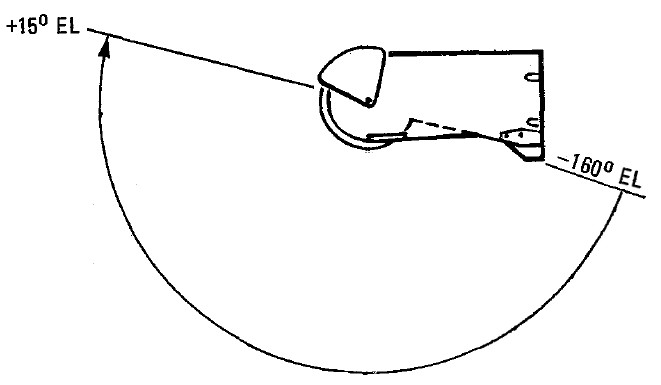
Limitations for the pods gimbals are
- Roll: -160 to +110 degrees
- Pitch: -160 to +15 degrees
- Yaw: -15 to +15 degrees
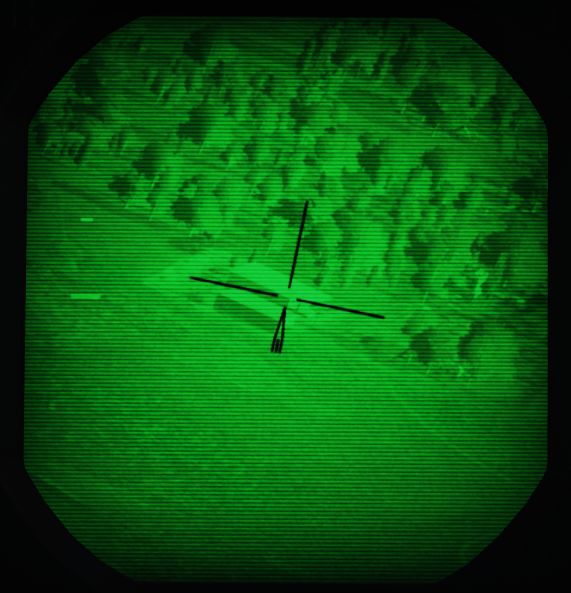
Symbology
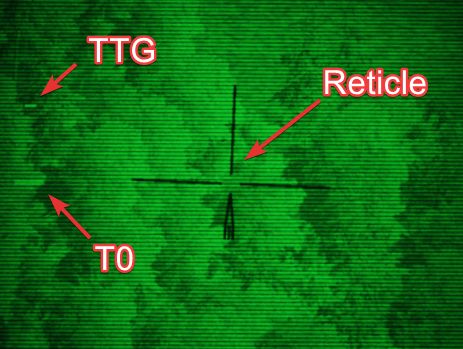
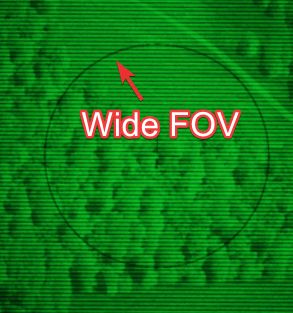
The TV image mainly consists of a reticle. The reticle rotates clockwise to indicate the pods current elevation. At a 90 degree rotation, the pod is looking straight down. If the reticle is almost upside down, the pod reached its gimbal limit for the elevation (160 degrees).
The wide field of view is indicated by a circle around the reticle.
On the left, the image displays two cues:
- Time To Go Cue (TTg)
- Release Cue (T0)
During weapon operation, TTg moves down until it intersects T0, indicating the time to release from maximally 15 seconds.
The cues also indicate various situations related to laser operation.
| Indication | T0 | TTG |
|---|---|---|
| not shown | not in TRACK mode | not in TRACK mode |
| steady | commanded to fire laser (full action) | firing laser, accepted range |
| flashing fast | not commanded to fire laser | not firing laser or target too far away |
| flashing slow | firing laser, but range rejected |
Controls
The Pave Spike is mostly interacted with by the WSO, while the Pilot has indicators assisting in keeping the pods line of sight within its limits.
The entire system, known as AN/ASQ-153 Electro-Optical Target Designator System, consists of:
- Range Indicator (Pilot)
- Azimuth-Elevation Indicator (Pilot)
- Laser Coder Control (WSO)
- Target Designator Set Control (WSO)
While the display is shown on the DSCG screens in both cockpits.
 (
(
 (
(
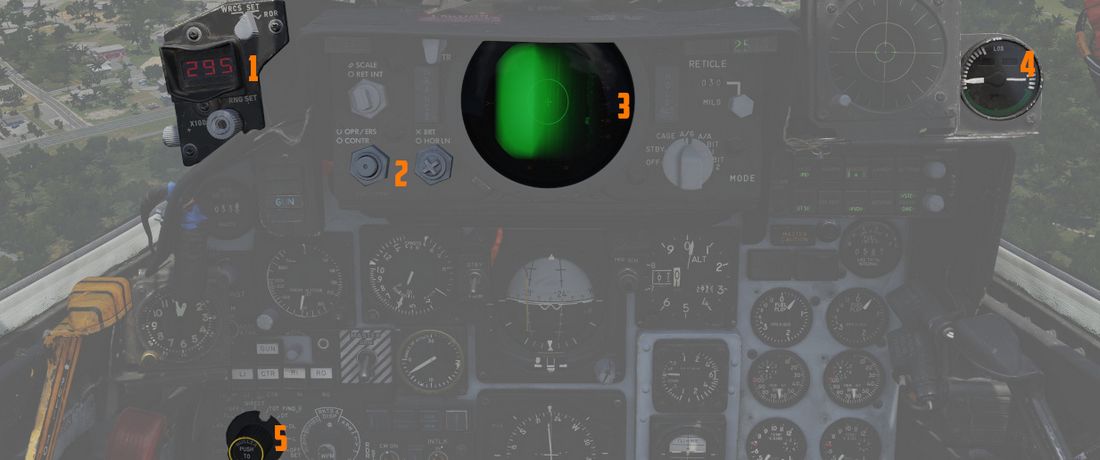
Azimuth-Elevation Indicator
The Azimuth-Elevation Indicator is the main instrument for the pilot to assess the pods current attitude in order to keep the line of sight within the operational limits.
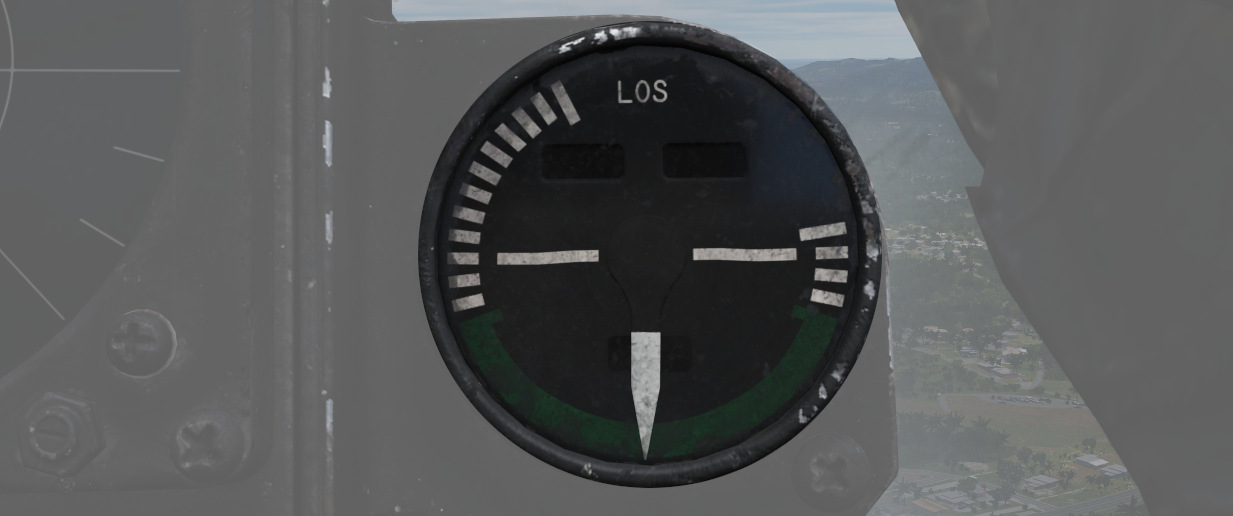
The needle shows the pods roll position from -160 (CW) to +110 (CCW) degrees.
Three flags indicate the elevation:
- green: -120 to -155 degrees
- yellow: -155 to -160 degrees
- red: -160 or beyond degrees
💡 If the needle is kept within the green labelled range and neither the yellow or red flag are shown, the view will not be obstructed by the pod or the aircraft.
Range Indicator
This panel provides the pilot with a readout of the slant range measured by the Pave Spike (x100 ft).
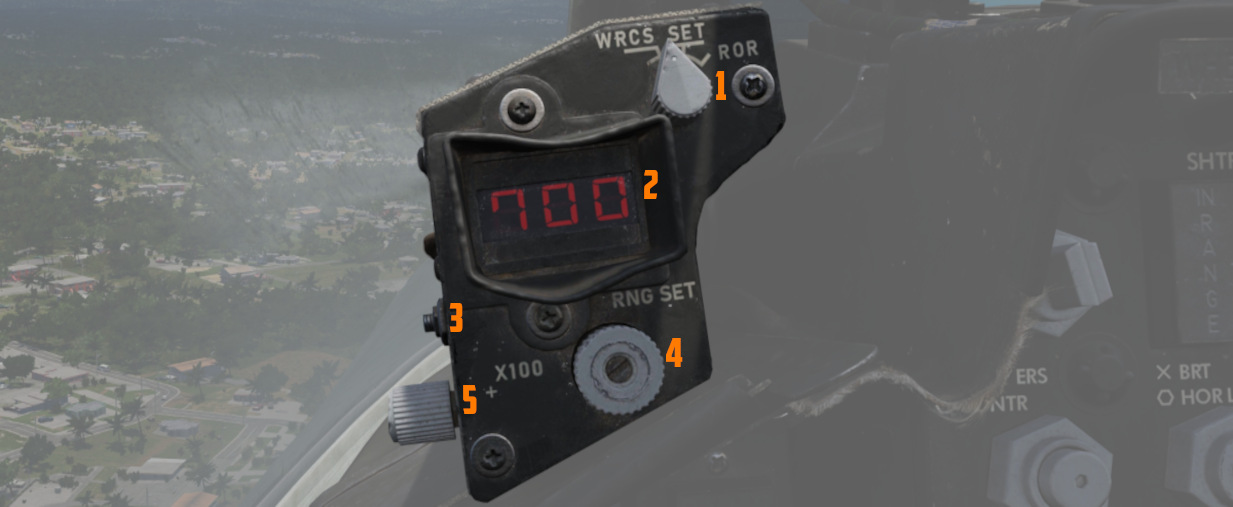
When the Test-Button (
The Mode-Knob (
- WRCS - Automatic Delivery
- ROR - Release on Range
In the SET position, the display shows the desired release range used in the ROR
mode. The knob below the readout (
Laser Coder Control
The WSO can set the laser code used by the targeting pod by using the four small
push-buttons (
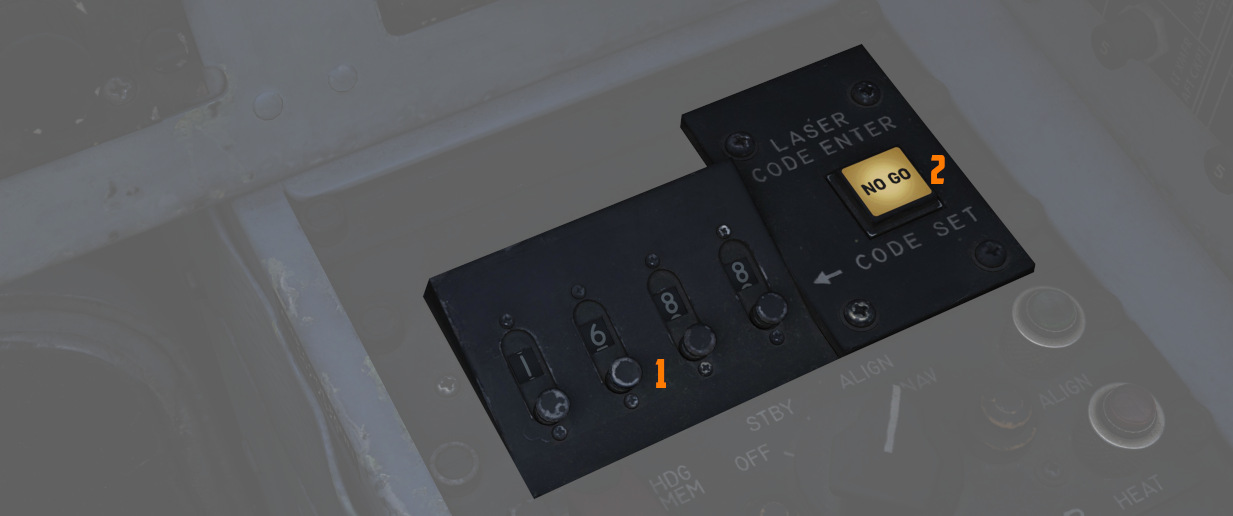
The Laser Coder system starts validating the entered code, this process takes about 5 seconds. If the NO-GO lamp is lit, the code is invalid.
💡 Codes directly relate to lasers frequencies, resulting in them having to be between 1111 and 1788 and not use digits 0 or 9 in order to be valid.
When power is applied to the system, it automatically initiates a transfer of the currently set code.
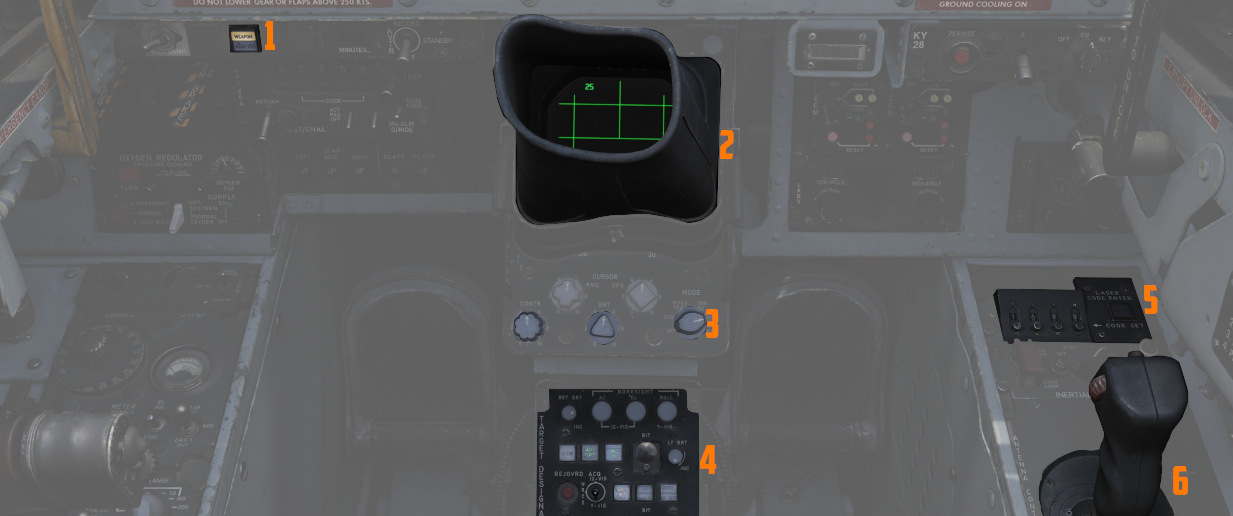
Target Designator Control Set
This is the main panel to interact with the targeting pod.
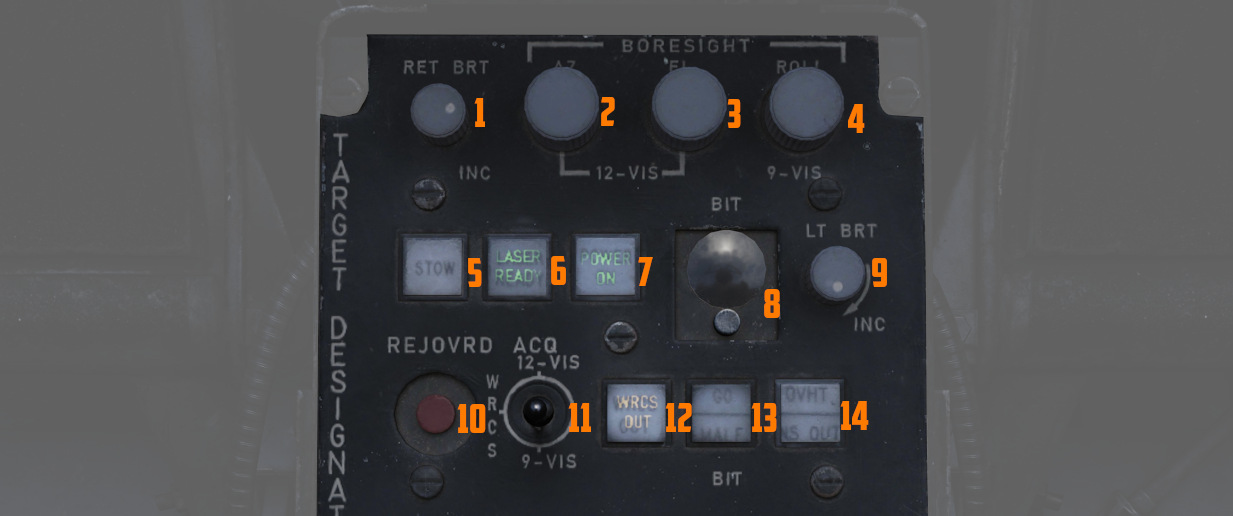
From left to right, top to bottom, it provides the WSO with:
- Reticle Brightness Knob (
1 ) - change the reticle from black to green - Az/El/Roll Boresight Knobs (
2 ,3 ,4 ) - adjust the boresight position of the pod within ±2.5 degrees - Stow Button (
5 ) - Stow or Un-stow the pod - Laser Ready Button (
6 ) - Arm or Disarm the laser - Power On Button (
7 ) - Turn the pod on or off - Currently selected BIT, with push button to advance the BIT (
8 ) - Light Brightness Knob (
9 ) - adjust brightness of all lights on this panel (except the Overheat lamp) - Reject/Override Button (
10 ) - Force the use of the laser slant range - Acquisition Mode Switch (
11 ) - Select the Acquisition Mode (12-VIS, WRCS or 9-VIS) - WRCS Out Button (
12 ) - Toggle WRCS integration with the pod - GO/MALF Lamp (
13 ) - Indicates BIT results - INS Out Button (and Overheat lamp) (
14 ) - Toggle INS integration with the pod
The lamps generally indicate the current status, while the push buttons can be used as a manual command. For example, pressing the Laser Ready Button is not enough for the laser to actually be ready. The lamp will only be lit if all other conditions, such as a valid laser code being set, are met.
Antenna Hand Control
During Track mode, the WSO can manually slew and correct the pods line of sight with the Antenna Hand Control, or Antenna Stick.
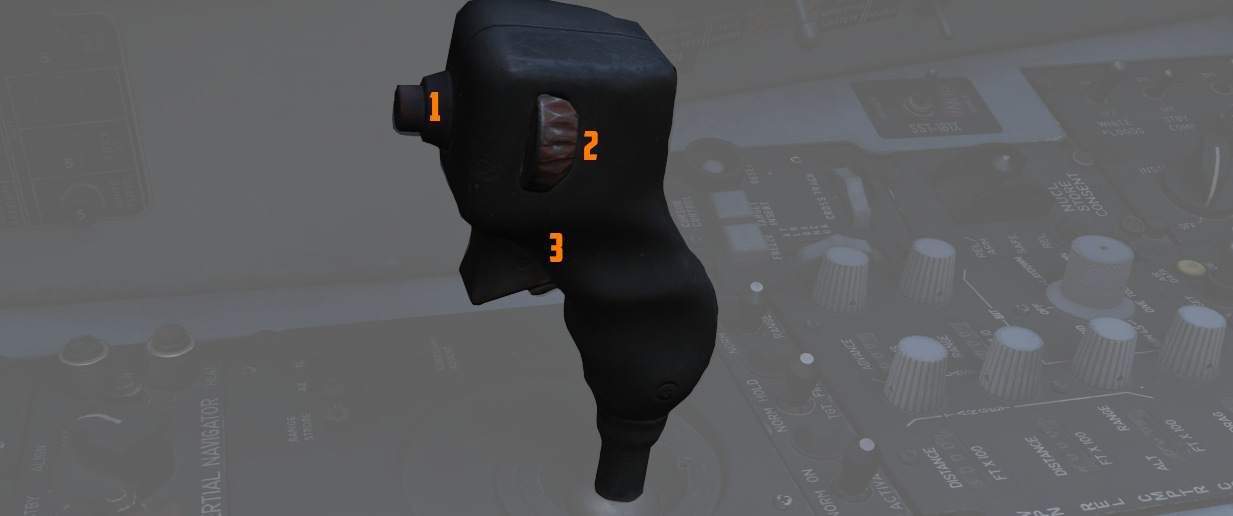
The Challenge Button (
💡 Controls are not inverted. Moving the stick up also moves the view up (pitch up).
💡 The pods math is fairly limited, do not move the reticle above the aircraft datum line (looking up) or controls will invert and the pod is unable to compute target coordinates properly.
The trigger functions slightly different if used for the Pave Spike, compared to the radar or also some other aircraft. To fire the laser, instead of perhaps holding the trigger down, one has to complete the sequence and move the trigger through all its stages forth and back, i.e. from Released to Half Action, to Full Action, back to Half Action and Released. Completing this sequence will toggle the laser on or off. To enter track mode, one has to complete the sequence Released to Half Action and back to Released. Holding the trigger at any point will not actuate the linked action.
💡 Our provided binds make sure to execute the sequence properly. For physical 2-stage triggers, use the corresponding 2-stage binds.