Aft Section
The aft section of the left console holds communication and navigation controls.
TACAN Control Panel
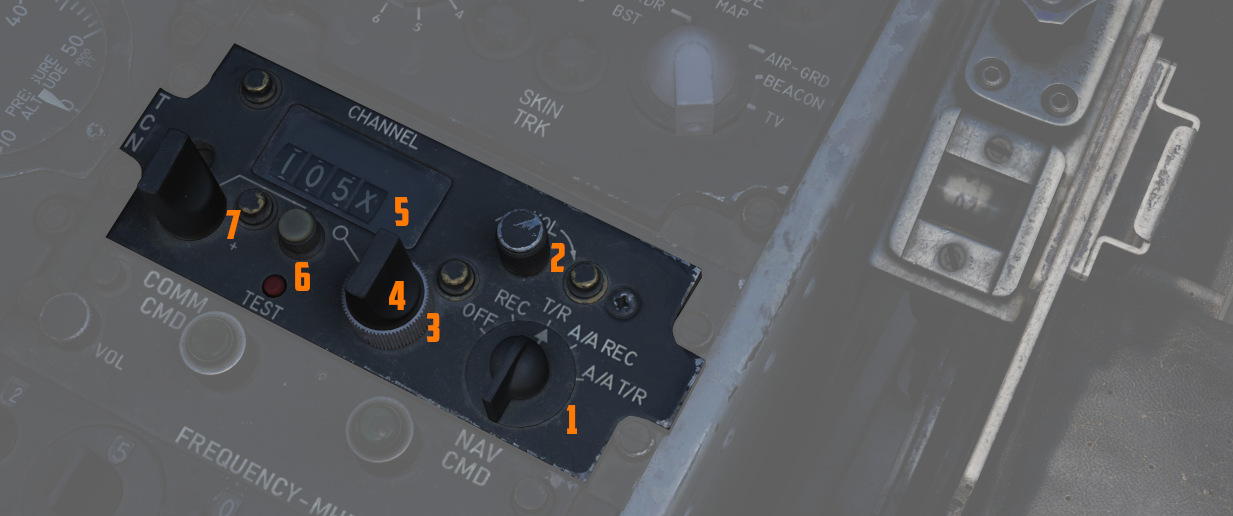
The TACAN Control Panel is used to enter the desired TACAN channel, mode, and audible volume for the monitoring of said channel by the aircrew. The panel is duplicated in both cockpits, and the panel in command of the TACAN receiver is selected with the NAV CMD button of the Communication Control Panel.
Channel Knobs
On the control panel there are two Navigation Channel Control knobs (7, 4 and
3), with the left (
Test Button and Lamp
Between these two knobs is the TEST button (
The lamp above the button illuminates to indicate test status.
See 7.19.4 Navigation test procedures chapter for further information.
Volume Knob
To the upper right, the VOL knob (
Function Selector
The TACAN Function Selector Knob
(
| Name | Description |
|---|---|
| OFF | The TACAN receiver is de-energized and offline. |
| REC | The TACAN receiver is active, providing bearing information on the HSI, BDHI, and ADI. |
| T/R | Both the receive and transmit functions of the TACAN are active, which provide bearing and nautical mile range information for the HSI and BDHI. |
| A/A REC | The TACAN receiver decodes bearing information from compliant aircraft for the HSI, BDHI, and ADI steering display. |
| A/A TR | The TACAN receiver receives both bearing and slant range information in nautical miles from the transmitting aircraft, providing this on the HSI and BDHI. |
💡 Air to Air TACAN functionality requires the channel to be set 63 channels above or below the cooperating aircraft, but on the same range- X or Y. So a tanker on 123Y should be set to 60Y in the F-4.
Communication Control Panel

The Communication Control Panel provides a selection and mode of the UHF radio in the aircraft.
Command Buttons
The panel is duplicated in both cockpits, and control over the radio is
determined through pushing the COMM CMD Button (
Radio Volume
Beneath the COMM CMD button is the radio volume (
Squelch Switch
Close to the NAV CMD button is the Squelch switch (
Frequency and Channels
The A-3-2-T Selector knob (
💡 Due to engine limitations, modes A and T, belonging to the HAVE-Quick functionality, are not simulated.
The four Frequency Selection Knobs work in concert with the A-3-2-T knob and
Preset/Manual switch. Frequencies are entered beginning with the 3 or 2
selection on the A-3-2-T Selector, and can be entered from 225.00 to 399.975 MHz
in increments of 0.025. With the Preset/Manual switch (
Directly underneath the Comm Channel Control Knob is the Aux Channel Knob
(
The Aux Volume Control knob (
The Set button (
Tone Button
The Tone Pushbutton (
💡 Due to engine limitations, the tone button, belonging to the HAVE-Quick functionality, is not simulated.
Comm Function Selector
The Comm Function Selector Knob (
| Name | Description |
|---|---|
| OFF | All UHF Radios off. |
| T/R ADF | Comm receiver - comm reception. |
| Comm transmitter - comm transmission. | |
| Comm guard receiver - standby. | |
| Aux receiver - ADF reception. | |
| T/R+G ADF | Comm receiver - comm reception. |
| Comm transmitter - comm transmission. | |
| Comm guard receiver - guard reception. | |
| Aux receiver - ADF reception. | |
| ADF+G CMD | Comm receiver - ADF reception. |
| Comm transmitter - comm transmission. ADF interrupted during transmission. | |
| Comm guard receiver - guard reception on ADF antenna. | |
| Aux receiver- comm reception. | |
| ADF+G | Comm receiver - ADF reception. |
| Comm transmitter - comm transmission. ADF interrupted during transmission. | |
| Comm guard receiver - standby. | |
| Aux receiver- guard reception. | |
| Guard ADF | Comm receiver - guard reception. |
| Comm transmitter - guard transmission. | |
| Comm guard receiver - standby. | |
| Aux receiver - ADF reception. |
Cockpit Altitude Gauge

Displays the current pressure inside the cockpit as a means of equivalent effective cabin altitude above mean sea level in thousands of feet.
That is, if the gauge reads 5, the pressure inside the cabin is equivalent to an altitude of 5000 ft MSL.
To prevent sickness and hypoxia, the pressure should be observed and oxygen supply adjusted accordingly:
| Pressure Range | Description |
|---|---|
| below 13000 ft | Breath regular air |
| 13000 ft - 40000 ft | Breath Oxygen through mask |
| 40000 ft - 62000 ft | Breath pressurized Oxygen through mask |
| above 62000 ft | Need to wear a pressure suit (not available) |
See 3.7 Utility chapter, Oxygen section for further information.
Oxygen Quantity Gauge
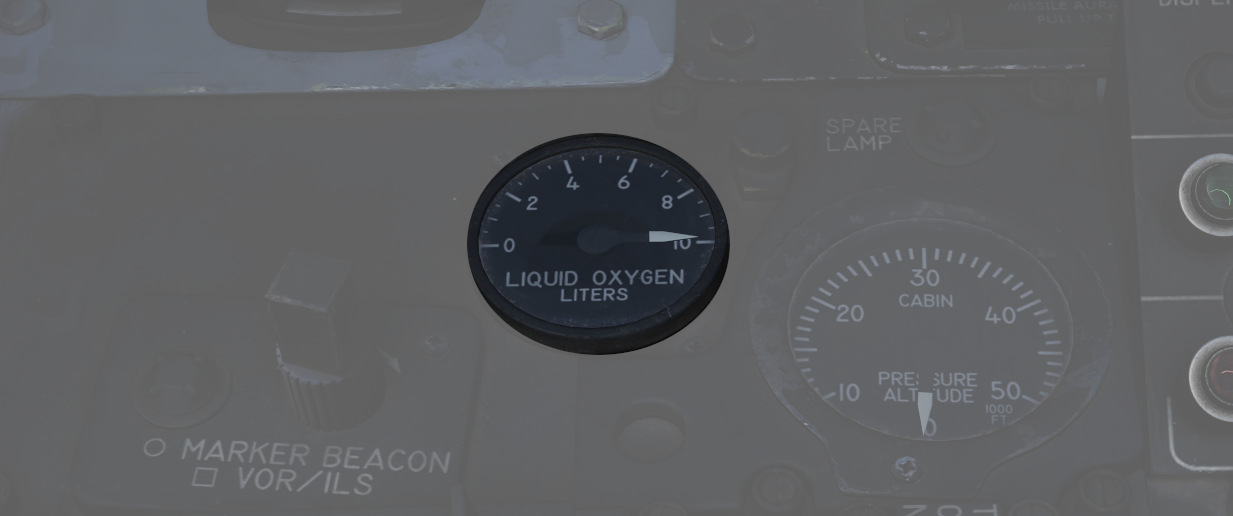
It has a range from 0 to 10 liters. Loss of electrical power is indicated by appearance of a power-OFF flag on the instrument face.
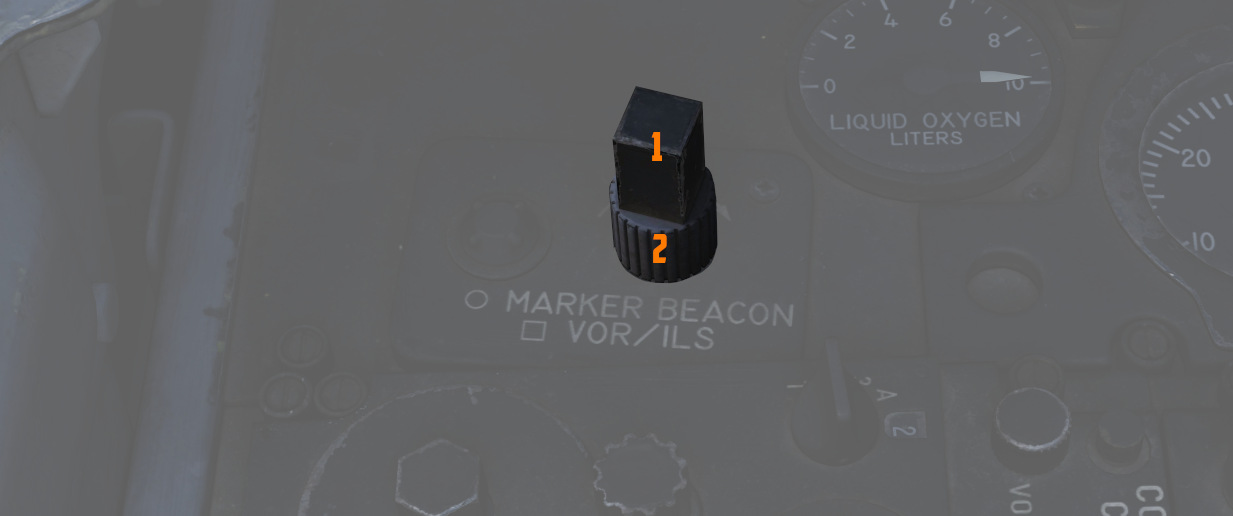
VOR/ILS Volume Control
The volume control consists of two knobs: one square knob (
See 3.3.4 VOR/ILS Chapter for further information.